2. A Modal Pop-up Dialog-Style Component
AJAX provides another interesting feature that makes Web applications appear more like desktop applications: the ModalPopup extender.
Historically, navigating a Web site involves users walking down the
hierarchy of a Web site and climbing back out. When users provide inputs
as they work with a page, the only means available to give feedback
about the quality of the input data has been the validation controls. In
addition, standard Web pages have no facility to focus users' attention
while they type in information.
Traditional desktop
applications usually employ modal dialog boxes to focus user attention
when gathering important information from the end user. The model is
very simple and elegant: The end user is presented with a situation in
which he or she must enter some data and then click OK or Cancel before
moving on. After dismissing the dialog box, the end user sees exactly
the same screen he or she saw right before the dialog box appeared.
There's no ambiguity and no involved process where the end user must
walk up and down some arbitrary page hierarchy.
This example shows how to use the pop-up dialog extender
control. You create a page with some standard content and then have a
modal dialog-style pop-up window appear right before the page is
submitted.
Using a ModalPopup extender
Add a new page to AJAXORama to host the pop-up extender. Call it UseModalPopupExtender.
As with all the other examples using AJAX controls, drag a ScriptManager from the Toolbox onto the page.
Add
a title to the page (the example here uses "ASP.NET Code of Content").
Give the banner some prominence by surrounding it with <h1> and
</h1> tags. You can simply replace the existing <div> tag
with the <h1> tag.
Drag a Panel from the Toolbox onto the page to hold the page's normal content.
Add a Button to the Panel for submitting the content. Give the Button the ID ButtonSubmit and the text Submit and create a button Click event handler. You need this button later.
Place
some content on the panel. The content in this sample application uses
several check boxes that the modal dialog pop-up examines before the
page is submitted.
<h1 >ASP.NET Code Of Conduct </h1>
<asp:Panel ID="Panel1" runat="server"
style="z-index: 1;left: 10px;top: 70px;
position: absolute;height: 213px;width: 724px;
margin-bottom: 0px;">
<asp:Label ID="Label1" runat="server"
Text="Name of Developer:"></asp:Label>
<asp:TextBox ID="TextBox1"
runat="server"></asp:TextBox>
<br />
<br />
<br />
As an ASP.NET developer, I promise to
<br />
<input type="checkbox" name="Check" id="Checkbox1"/>
<label for="Check1">Use Forms Authentication</label>
<br />
<input type="checkbox" name="Check" id="Checkbox2"/>
<label for="Check2">Separate UI From Code</label>
<br />
<input type="checkbox" name="Check" id="Checkbox3"/>
<label for="Check3">Take Advantage of Custom Controls</label>
<br />
<input type="checkbox" name="Check" id="Checkbox4"/>
<label for="Check4">Use AJAX</label>
<br />
<input type="checkbox" name="Check" id="Checkbox5"/>
<label for="Check5">Give MVC a try</label>
<br />
<input type="checkbox" name="Check" id="Checkbox6"/>
<label for="Check6">Give Silverlight a try</label>
<br />
<asp:Button ID="ButtonSubmit" runat="server" Text="Submit"
onclick="ButtonSubmit_Click" />
<br />
</asp:Panel>
Add another Panel to the page to represent the pop-up. Give this Panel a light yellow background color so that you'll be able to see it when it comes up. It should also have the ID PanelModalPopup.
Add some content to the new Panel that's going to serve as the modal pop-up. At the very least, the pop-up should have OK and Cancel buttons. Give the OK and Cancel buttons the ID values ButtonOK and ButtonCancel. You need them a bit later, too.
<asp:Panel ID="PanelModalPopup" runat="server"
BorderColor="Black"
BorderStyle="Solid"
BackColor="LightYellow" Height="72px"
Width="403px">
<br />
<asp:Label
Text="Are you sure these are the correct entries?"
runat="server">
</asp:Label>
<asp:Button ID="ButtonOK"
runat="server"
Text="OK" />
<asp:Button ID="ButtonCancel"
runat="server" Text="Cancel" />
<br />
</asp:Panel>
Add a script block to the ASPX file. You need to do this by hand. Write functions to handle the OK and Cancel
buttons. The example here examines check boxes to see which ones have
been selected and then displays an alert to show which features have
been chosen. The Cancel handler simply displays an alert indicating that the Cancel button was clicked:
<script type="text/javascript">

    function onOk() {
        var optionsChosen;
        optionsChosen = "Options chosen: ";

        if($get('Checkbox1').checked)
        {
          optionsChosen =
             optionsChosen.toString() +
             "Use Forms Authentication ";
        }

        if($get('Checkbox2').checked)
        {
          optionsChosen =
             optionsChosen.toString() +
             "Separate UI From Code ";
        }

        if($get('Checkbox3').checked)
        {
          optionsChosen =
             optionsChosen.toString() +
             "Take Advantage of Custom Controls ";
        }

        if($get('Checkbox4').checked)
        {
          optionsChosen =
             optionsChosen.toString() +
             "Give AJAX a try ";
        }
        alert(optionsChosen);
    }

    function onCancel() {
       alert("Cancel was pressed");
    }
</script>
Drag the ModalPopup extender from the Toolbox onto the page.
Add the following markup to the page to set various properties on the new ModalPopup extenders.s This sets the OkControIID property to ButtonOK and the CancelControlID property to ButtonCancel. It also sets the OnCancelScript property to onCancel() (the client-side Cancel script handler you just wrote). Set OnOkScript="onOk()" (the client-side OK script handler you just wrote). Finally, the following markup sets the TargetControlID property to ButtonSubmit:
<cc1:ModalPopupExtender
    ID="ModalPopupExtender1"
    runat="server"
    OkControlID="ButtonOK"
    CancelControlID="ButtonCancel"
    OnCancelScript="onCancel()"
    OnOkScript="onOk()"
    TargetControlID="ButtonSubmit"
    PopupControlID="PanelModalPopup"
    runat="server"
    DynamicServicePath="" Enabled="True">
</cc1:ModalPopupExtender>
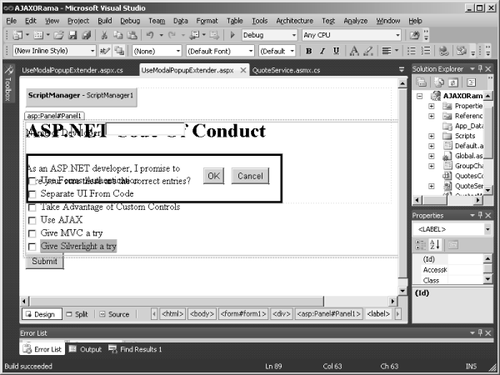
This graphic shows the layout of the page using the ModalPopup extender in Visual Studio 2010:
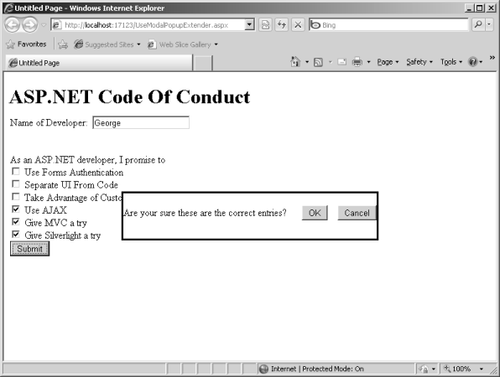
Run the page. When you click the Submit button, the Panel designated to be the modal pop-up window is activated. (Remember, the Submit button is the TargetControlID of the ModalPopup
Extender.) When you dismiss the pop-up window by clicking OK or Cancel,
you should see the client-side scripts being executed. The following
graphic image shows the ModalPopup extender displaying the modal pop-up window: